Obstacle Breaching Theory
Breaching operations are conducted to allow maneuver despite the presence of obstacles. Obstacle breaching is the employment of a combination of tactics and techniques to advance an attacking force to the far side of an obstacle that is covered by fire. It is perhaps the single, most difficult combat task a force can encounter. Understanding breaching theory is the first step to understanding breaching tactics. Breaching is a synchronized combined-arms operation under the control of a maneuver commander. Breaching operations begin when friendly forces detect an obstacle and begin to apply the breaching fundamentals, and they end when battle handover has occurred between follow-on forces and a unit conducting the breaching operation. Bulling through or forcing through is not a breaching operation. Bulling through is a decision made when a commander must react immediately to extricate his force from an untenable position within an obstacle and no other breaching operations are possible. When a force is in a minefield receiving fires and taking heavy losses, the commander may decide to immediately bull through the minefield rather than withdraw or reduce the obstacle.
Definitions
1-1. The following definitions are inherent to obstacle breaching and are used throughout this manual:
- Obstacle . An obstacle is any obstruction that is designed or employed to disrupt, fix, turn, or block the movement of an opposing force (OPFOR) and to impose additional losses in personnel, time, and equipment on the OPFOR. Obstacles can exist naturally (existing), be man-made (reinforcing), or be a combination of both. A complex obstacle is a combination of different types of individual obstacles that requires more than one reduction technique (explosive, mechanical, manual) to create a lane through the obstacle. A reinforcing obstacle is an obstacle that is specifically constructed, emplaced, or detonated through military effort. (For more information on obstacle classification, see FM 90-7 .) The types of reinforcing obstacles are—
- Tactical . A tactical obstacle is employed to disrupt enemy formations, turn them into a desired area, fix them in position under direct and indirect fires, or block their penetration while multiplying the effects and capabilities of firepower.
- Protective . A protective obstacle is employed to assist a unit in its local, close-in protection.
- Lane . A lane is a route through, over, or around an enemy or friendly obstacle that provides safe passage of a passing force. The route may be reduced and proofed as part of a breaching operation, be constructed as part of the obstacle, or be marked as a bypass.
- Reduction . This is a task to create and mark lanes through, over, or around an obstacle to allow the attacking force to accomplish its mission. Normally, engineers and reduction assets are used to reduce an obstacle.
- Proofing . Proofing verifies that a lane is free of mines and that the width and trafficability of the point of breach are suitable for the assault force. Proofing can be conducted visually (against surface-laid minefields), electronically (mine detectors), or mechanically (mine-clearing rollers [MCRs]). Proofing is conducted when the risk of live mines remaining in the lane exceeds the risk of loss (lives and equipment) to enemy fires while waiting to complete proofing. Some mines are resistant to some reduction assets; for example, magnetically fused mines may be resistant to a mine-clearing line charge (MICLIC). Proofing is vitally important, considering the vast variety of mines in use. It should always be planned for a breaching operation; however, the time available, the threat, or the mission may dictate that proofing not be done.
- Clearing . This is the total elimination or neutralization of an obstacle or a portion of the obstacle. Clearing operations are not conducted under fire and are usually performed by follow-on engineer forces.
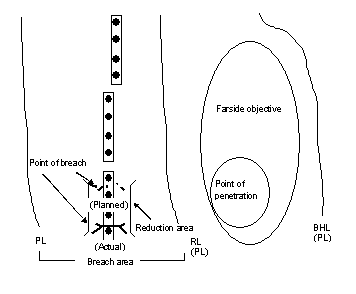
- Breach area . The breach area is established and fully defined by the higher headquarters (HQ) of the unit conducting breaching operations. It is the area where a breaching operation occurs. The area must be large enough to allow the attacking unit to deploy its support force and extend far enough on the far side of the obstacle to allow follow-on forces to deploy before leaving the breach area. One technique is to establish the breach area using phase lines (PLs) or unit boundaries. The PL defining the far side of the breach area may be established as a battle handover line (BHL).
- Farside objective . The farside objective is the immediate objective of the attacking unit's assault force, and it may be oriented by the terrain or the enemy force. The higher HQ assigns the objective; however, the attacking unit normally subdivides the objective into smaller objectives to assign responsibilities and to control and focus the assault of subordinate forces. When breaching as part of a larger force, seizing the farside objective provides the necessary maneuver space for the higher unit's follow-on forces to move securely through the lanes, assemble or deploy, and continue the attack without enemy interference.
- Bypass . A bypass is a tactical task that involves maneuvering around an obstacle, a position, or an enemy force to maintain the momentum of advance. When a unit bypasses an obstacle, it physically changes the direction of movement to avoid the obstacle. This must be done with caution because it might play into the enemy's hand. Bypassed obstacles and enemy forces are reported to higher HQ.
- Point of penetration . This is the location, which is identified on the ground, where the commander concentrates his efforts at the enemy's weakest point to seize a foothold on the farside objective. This is achieved along a narrow front through maneuver and direct and indirect fires that are accurately placed against enemy forces. A commander conducting a breaching operation establishes a point of penetration that supports planning locations for the reduction area and the seizure of the farside objective.
- Reduction area . This is a number of adjacent points of breach that are under the control of the breaching commander. The commander conducting the attack determines the size and location of the reduction area that supports the seizure of a point of penetration (see Figure 1-1 ).
-
Point of breach . This is the location at an obstacle where the creation of a lane is being attempted. Initially, points of breach are planned locations only. Normally, the breach force determines the actual points of breach during the breaching operation.
|
|
Breaching Tenets
1-2. Successful breaching operations are characterized by applying breaching tenets. These tenets should be applied whenever an obstacle is encountered in the area of operations (AO), whether during an attack or during a route clearance operation. The tenets are—
Intelligence
1-3. Success depends largely on the force commander's ability to see the battle space . He must identify how the enemy is using the terrain to minimize the risk of surprise. This is particularly true when attempting to counter the enemy's use of obstacles. The force commander does this with the intelligence preparation of the battlefield (IPB) process. During the IPB process, the situation template (SITEMP) is developed. The SITEMP is a graphic depiction of expected threat dispositions based on threat doctrine and the effects of the battle space for a particular course of action (COA). Based on the commander's estimates, the staff develops a SITEMP for multiple enemy COAs. The SITEMP helps drive the maneuver planning in support of war gaming and the development of the event template. The SITEMP also drives the decisions the commander must be prepared to make. The commander uses the decision-support template (DST) to convey these decisions in graphic form. The IPB process helps achieve success by focusing available intelligence-gathering assets toward answering the commander's priority intelligence requirements (PIR). Intelligence that is gathered later by recon becomes the foundation for developing and revising a SITEMP. (See Appendix B for information on threat mine operations.)
1-4. Time-constrained planning requires the rapid development of the enemy's SITEMP. A minimal SITEMP, complete with templated obstacles, allows the development of an initial event template and provides initial PIR for the intelligence-collection plan (ICP). At a minimum, the unit can template an obstacle trace that is precise, as far as the location, and represents the total expected enemy countermobility effort but does not depict individual obstacles. The staff plots the actual composition of the trace based on incoming obstacle reports. Adequate time for intelligence collection is critical in developing an accurate picture of the battle space, yet time is normally in short supply. While templating is essential to focus the ICP, too much time can be spent on templating at the expense of intelligence, surveillance, and reconnaissance (ISR).
1-5. In any operation where enemy obstacles can interfere with friendly maneuver, obstacle intelligence (OBSTINTEL) is always one of the information requirements (IR) and should become PIR. Finding enemy obstacles or seeing enemy obstacle activity validates and refines the Intelligence Officer's (US Army) (S2's) picture of the battle space. OBSTINTEL helps the S2 determine the enemy's intentions, plans, and defense strength. The force engineer is the unit's expert on enemy countermobility capabilities. He assists the S2 in templating enemy obstacles, analyzing OBSTINTEL, and analyzing the effects of terrain.
1-6. An unverified enemy template can lead to disaster because the force may aim an attack at the wrong place. Units may deploy to reduce expected obstacles early, wasting mission time to feel their way into nonexistent obstacles; or they may blunder into an unexpected obstacle or an enemy engagement area (EA).
1-7. OBSTINTEL can be a critical indicator to verify an enemy template. The force's Operations and Training Officer (US Army) (S3), S2, and engineer establish effective OBSTINTEL collection by determining specific obstacle IR. Examples of information that is needed to fulfill obstacle IR include—
- The location of existing and reinforcing obstacles.
- The orientation and depth of obstacles.
- Conditions of the soil (in the case of a minefield) to determine the ability to use tank plows.
- The presence, location, and type of wire.
- Lanes and bypasses.
- The composition of the minefield (buried or surface-laid antitank [AT] and antipersonnel [AP] mines, antihandling devices [AHDs], and the depth of the mines).
- Types of mines and fuses.
- The location of enemy indirect-fire systems that can fire into the breach area.
- The composition of complex obstacles.
- Areas between successive obstacle belts.
1-8. OBSTINTEL is particularly important for discovering the types of mines and mine fuses the enemy has employed. The engineer depends on this information since he must determine which reduction techniques offer the best chance for success and minimize the risk to the breach force. This may require a dismounted recon patrol to examine mines within a minefield. The enemy may employ security patrols, have forces overwatching the obstacle, or place forces within the obstacle to prevent obstacle recon.
1-9. Obtaining OBSTINTEL requires dedicated collection assets. These assets identify survivability positions and obstacle emplacement activity. Aviation units, who are tasked to perform recon in the area, may be able to provide valuable OBSTINTEL information. Ground-surveillance radar may also provide useful information.
1-10. Recon forces should have the capability to collect OBSTINTEL. To be successful in this collection, the obstacle recon efforts must be tied into the maneuver force's overall reconnaissance and surveillance (R&S) plan. A force ensures this capability by training dedicated recon assets on collecting required obstacle information or by augmenting recon forces with engineer recon teams provided by the supporting engineer force. An engineer recon team moves with scouts or a patrol and conducts dismounted recon of templated or confirmed obstacles. This team has the flexibility to dismount and develop the details of the obstacle. Personnel engaged in a recon mission for OBSTINTEL should be used rarely, if ever, to reduce obstacles during the mission; although they make ideal guides to breach forces for subsequent breaching operations. Inadvertent detonation during reduction may compromise engineers and scouts, defeating the recon mission. It may also compromise the entire attack. FM 5-170 describes capabilities, limitations, and employment concepts of engineer recon teams.
Breaching Fundamentals
1-11. Suppress, obscure, secure, reduce, and assault (SOSRA) are the breaching fundamentals that must be applied to ensure success when breaching against a defending enemy. These fundamentals will always apply, but they may vary based on the specific battle-space situation (mission, enemy, terrain, troops, time available, and civilian considerations [METT-TC]).
Suppress
1-12. Suppression is a tactical task used to employ direct or indirect fires or an electronic attack on enemy personnel, weapons, or equipment to prevent or degrade enemy fires and observation of friendly forces. The purpose of suppression during breaching operations is to protect forces reducing and maneuvering through an obstacle.
1-13. Effective suppression is a mission-critical task performed during any breaching operation. Suppressive fires in sufficient volume serve to secure the reduction area. Successful suppression generally triggers the rest of the actions at the obstacle. Fire control measures ensure that all fires are synchronized with other actions at the obstacle. Although suppressing the enemy overwatching the obstacle is the mission of the support force, the breach force should be able to provide additional suppression against an enemy that the support force cannot effectively suppress.
Obscure
1-14. Obscuration must be employed to protect forces conducting obstacle reduction and the passage of assault forces. Obscuration hampers enemy observation and target acquisition and conceals friendly activities and movement. Obscuration smoke deployed on or near the enemy's position minimizes its vision. Screening smoke employed between the reduction area and the enemy conceals movement and reduction activities. It also degrades enemy ground and aerial observations. Obscuration must be carefully planned to provide maximum degradation of enemy observation and fires, but it must not significantly degrade friendly fires and control.
Secure
1-15. Friendly forces secure the reduction area to prevent the enemy from interfering with obstacle reduction and the passage of the assault force through the lanes created during the reduction. Security must be effective against outposts and fighting positions near the obstacle and against overwatching units, as necessary. The far side of the obstacle must be secured by fires or be occupied before attempting any effort to reduce the obstacle. The attacking unit's higher HQ has the responsibility to isolate the breach area by fixing adjacent units, attacking enemy reserves in depth, and providing counterfire support.
1-16. Identifying the extent of the enemy's defenses is critical before selecting the appropriate technique to secure the point of breach. If the enemy controls the point of breach and cannot be adequately suppressed, the force must secure the point of breach before it can reduce the obstacle.
1-17. The breach force must be resourced with enough maneuver assets to provide local security against the forces that the support force cannot sufficiently engage. Elements within the breach force that secure the reduction area may also be used to suppress the enemy once reduction is complete.
Reduce
1-18. Reduction is the creation of lanes through or over an obstacle to allow an attacking force to pass. The number and width of lanes created varies with the enemy situation, the assault force's size and composition, and the scheme of maneuver. The lanes must allow the assault force to rapidly pass through the obstacle. The breach force will reduce, proof (if required), mark, and report lane locations and the lane-marking method to higher HQ. Follow-on units will further reduce or clear the obstacle when required. Reduction cannot be accomplished until effective suppression and obscuration are in place, the obstacle has been identified, and the point of breach is secure. Obstacle-reduction techniques are discussed in more detail in Appendix C .
Breaching Organization
1-20. A commander organizes friendly forces to accomplish the breaching fundamentals quickly and effectively. This requires him to organize support, breach, and assault forces with the necessary assets to accomplish their roles (see Table 1-1).
Support Force
1-21. The support force's primary responsibility is to eliminate the enemy's ability to interfere with a breaching operation. It must—
- Isolate the reduction area with fires.
- Mass and control direct and indirect fires to suppress the enemy and to neutralize any weapons that are able to bring fires on the breach force.
- Control obscuring smoke to prevent enemy-observed direct and indirect fires.
1-22. Suppression is critical for a successful breaching operation; therefore, allocation of adequate forces to the support force is essential. The commander must allocate enough direct- and indirect-fire systems to the support force to allow it to accomplish its missions. When resourcing the support force, consider the losses it will receive as it fights its way into its support-by-fire (SBF) position. To increase the survivability of the support force, the commander may establish critical friendly zones (CFZs) in support of the support force once it has occupied its SBF positions. A CFZ is an area, usually a friendly unit or location, that the maneuver commander designates as critical to protect an asset whose loss would seriously jeopardize the mission. Covered by a radar sector, the CFZ supports counterfire operations by providing the most responsive submission of targets to the fire-support system when rounds impact inside the CFZ. (For more detailed information on CFZs, see FM 6-121 .)
1-23. The support force must seize an SBF position, seeking maximum protection from the terrain. If possible, the support force should follow a covered or concealed route to the SBF position, take up its assigned sectors of fire and observation, and begin to engage the enemy. It may have to make some adjustments to its direct-fire plan if the situation dictates. Observation is particularly critical. Artillery observers with the support force may initially bring indirect fires on enemy positions to fix and suppress the enemy. The support force adjusts the artillery-delivered obscuring smoke, if necessary, to protect the breach and assault forces as they approach the reduction area.
Breach Force
1-24. The breach force assists in the passage of the assault force by creating, proofing (if necessary), and marking lanes. (For more information on the initial lane-marking pattern, see Chapter 3 .) The breach force is a combined-arms force. It includes engineers, reduction assets, and enough maneuver forces to provide additional suppression and local security. The breach force may apply portions of the following breaching fundamentals as it reduces an obstacle:
- Suppress . The breach force must be allocated enough maneuver forces to provide additional suppression against various threats, including—
- Enemy direct-fire systems that cannot be effectively observed and suppressed by the support force due to the terrain or the masking of the support force's fires by the breach force as it moves forward to reduce the obstacle.
- Counterattacking and/or repositioning forces that cannot be engaged by the support force.
- Obscure . The breach force employs vehicle-mounted smoke systems and smoke pots, if necessary, for self-defense and to cover lanes while the assault force is passing.
- Secure . The breach force secures itself from dismounted threat forces who are providing close-in protection of the obstacle. The breach force also secures the lanes through the tactical obstacles, once they are created, to allow safe passage of the assault force.
- Reduce . The breach force performs its primary mission of reducing the obstacle. To support the development of a plan to reduce the obstacle, the composition of the obstacle system must be an IR.
- Assault . The breach force assaults through the point of breach to the far side of an obstacle and seizes the reduction area.
1-25. The breach force is comprised of two subordinate elements—security and reduction:
- Security element . The security element is comprised primarily of maneuver forces. It is normally responsible for providing additional suppression, obscuration, and local security.
- Reduction element . The reduction element is comprised primarily of reduction assets (mine-clearing blades [MCBs], MICLICs, armored vehicle-launched bridges [AVLBs], armored combat earthmovers [ACEs], dismounted engineers, and so forth). It is normally responsible for reducing the obstacle.
Chapter 2 provides more details on the roles, responsibilities, and command and control (C 2 ) of the security and reduction elements.
1-26. The breach force must be able to deploy and begin reducing the obstacle as soon as enemy fires have been suppressed and effective obscuration is achieved. It can expect enemy artillery fires within a matter of minutes. CFZs should be activated at the point of breach before the commitment of the breach force.
1-27. Engineers within the breach force are allocated with the reduction assets necessary to clear mines, nonexplosive obstacles, and small gaps. Scouts, engineers, or other recon assets are also capable of finding local bypasses or existing lanes in the obstacle system.
1-28. The commander allocates engineers and reduction assets based on the number of lanes required, the terrain, and the type of obstacle. The breach force must be able to create a minimum of one lane for each assaulting company or two lanes for the assaulting task force (TF).
1-29. The commander should plan for a 50 percent loss of mobility assets in close combat. As a planning factor, he should allocate one engineer platoon with the necessary reduction assets to create and mark one lane.
1-30. After the breach force has reduced the obstacle and passed the assault force through, the breach force may be required to hand over the lane to follow-on units. At a minimum, the lanes must be marked and their locations and conditions reported to higher HQ and follow-on units as prescribed in the unit's standing operating procedures (SOP).
Assault Force
1-31. The assault force's primary mission is to destroy the enemy and seize terrain on the far side of the obstacle to prevent the enemy from placing direct fires on the created lanes. The assault force may be tasked to assist the support force with suppression while the breach force reduces the obstacle.
1-32. The assault force must be sufficient in size to seize the point of penetration. Combat power is allocated to the assault force to achieve a minimum 3:1 ratio on the point of penetration. In a breaching operation, particularly TF and above, the assault force normally maneuvers as a separate force attacking through a reduced obstacle. However, breach and assault assets may maneuver as a single force when conducting lower-level breaching operations, such as an independent company team conducting an attack.
1-33. If the obstacle is defended by a small enemy force, assault and breach forces' missions may be combined. This simplifies C 2 and provides more immediate combat power for security and suppression.
1-34. Fire control measures are essential, since support and breach forces may be firing on the enemy when the assault force is committed. Suppression of overwatching enemy positions must continue and other enemy forces must remain fixed by fires until the enemy has been destroyed. The assault force must assume control for direct fires on the assault objective as support and breach forces' fires are lifted or shifted.
Mass
1-35. Breaching is conducted by rapidly applying concentrated efforts at a point to reduce the obstacle and penetrate the defense. Massed combat power is directed against the enemy's weakness. The location selected for breaching depends largely on the weakness in the enemy's defense, where its covering fires are minimized. If friendly forces cannot find a natural weakness, they create one by fixing the majority of the enemy force and isolating a small portion of it for attack.
Support Force
1-36. The support force suppresses the enemy to eliminate effective fires on the breach force. Smoke and terrain are used to help isolate the force under attack. Suppression requires the commander to mass enough overwatching direct fires to protect the breach force.
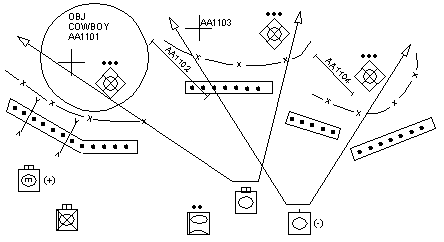
1-37. Normally, the TF isolates and destroys platoon-size elements in succession, starting with the platoon identified as the easiest to overwhelm. In Figure 1-2 , the TF commander employs a tank company team to fix two defending platoons and uses screening smoke (target AA1102) to help isolate the platoon selected for attack. Objective (OBJ) Cowboy has been identified by the TF commander as the point of penetration. The center and eastern platoons are suppressed by direct and indirect fires from a second tank company team.
|
1-38. The support force should be provided with reduction assets to reduce the impact that unexpected obstacles or scatterable minefields have on their approach to and occupation of SBF positions. Failure to do so may greatly impact on synchronizing the entire breaching operation. As a technique, a unit may create a mobility reserve that supports the main effort throughout the operation. Initially, the mobility reserve may support the support force until it has seized its SBF positions and then shift its support to the breach or assault force.
Breach Force
1-39. The commander also masses engineers and reduction assets to reduce the obstacle. The breach force is organized and equipped to use several different reduction techniques in case the primary technique fails; for example, if a key vehicle is destroyed or if casualties render dismounted engineers ineffective. Additional reduction assets are present to handle the unexpected. Normally, 50 percent more reduction assets than required for obstacle reduction are positioned with the breach force.
1-40. The breach force masses reduction efforts against the obstacle to ensure that it will successfully create enough lanes. A mounted TF-size assault force requires at least two lanes, but more lanes will speed passage through the danger area. The breach force attempts to simultaneously create as many lanes as necessary to ensure the rapid passage of the assault force through the obstacle system. This may require the breach force to simultaneously use a combination of mechanical, explosive, and manual techniques. For example, an engineer platoon may use two MICLICs as the primary technique to reduce a minefield. As soon as the engineer platoon fires the second MICLIC, engineer squads employ manual explosive techniques to create three additional lanes through the minefield. The commander must carefully plan and synchronize the creation of additional lanes to reduce the potential for fratricide with assaulting troops. The distance between the lanes depends on the enemy, the terrain, the need to minimize the effects of enemy artillery, the direct-fire plan of the support force, C 2 , and reduction-site congestion.
Assault Force
1-41. Achieving necessary mass for the assault requires the breach force to open enough lanes through the obstacle to permit rapid passage and the buildup of forces on the farside. The size of the assault force determines the number of lanes initially created. A mounted TF requires one lane per assaulting company team. A dismounted assault force requires one lane for each leading assault platoon. The tactical situation may require additional lanes to quickly pass a large assault force through the obstacle to achieve sufficient combat-power ratio.
1-42. The principle of mass influences the selection of the point of breach; the task organization of the support, breach, and assault forces; and the integration of engineers in movement or attack formations. Figure 1-2 shows a technique to achieve mass in the breach.
1-43. The need to generate enough mass and the maneuver space available strongly influence which echelon can conduct the breaching operation. A company team cannot simultaneously mass sufficient fires, reduce the obstacle, and assault the defending position unless it is a simple obstacle defended by no more than one platoon. A TF should have a combat-power ratio of 3:1 to reduce an obstacle defended by a company, and a TF is normally the echelon used to execute a breach. A brigade has sufficient combat power to attack a complex, well-defended obstacle; but a brigade has difficulty deploying all its combat power within range. Normally, a brigade breaches by isolating a small segment of the defense (platoon or company) that the TF can then attack as the breaching echelon. If obstacles and defenses are in-depth, mass is achieved by passing additional TFs through the obstacle to continue the attack.
Synchronization
1-44. Breaching operations require precise synchronization of the breaching fundamentals by support, breach, and assault forces. Failure to synchronize effective suppression and obscuration with obstacle reduction and assault can result in rapid, devastating losses of friendly troops in the obstacle or the enemy's EA.
1-45. A combined-arms breach is a complex operation by nature. Support, breach, and assault forces must apply the SOSRA breaching fundamentals within a short time and distance. The support force masses its direct fires and controls indirect fires in concert with breach and assault forces' maneuvers. The commander must employ smoke at the right time and place to maximize its effectiveness or risk hampering his own target acquisition and C 2 . The breach force must have the right reduction asset for the type of obstacle encountered. Engineers must ensure that they do not prematurely exhaust reduction assets needed to reduce subsequent obstacles. Table 1-2 shows the complexity of a combined-arms breach.
1-46. The commander ensures synchronization through proper planning and force preparation. Fundamentals to achieve synchronization are—
Detailed Reverse Planning
1-47. Synchronizing a combined-arms breach begins by using the reverse-planning process to ensure that actions at obstacles support actions on the objective. Planning the breach without regard to actions on the objective leads to disaster. During COA development, the staff analyzes the relative combat power and compares enemy and friendly strengths and weaknesses. The staff then generates options based on the commander's guidance and arrays the forces necessary to accomplish the mission. The staff develops the options by analyzing the objective and allocating forces to accomplish the mission. The commander decides how he must attack the objective to accomplish his mission. This decision drives where, how, and with what force he must support, breach, and assault through the enemy's obstacles. The commander approves the scheme of maneuver for the breaching phase of the operation that achieves adequate suppression, obscuration, and security. He also creates sufficient lanes to rapidly project combat power on the point of penetration and the far side of the objective, not just to the far side of the obstacle. Reverse planning gives purpose to the breaching plan that supports mission accomplishment.
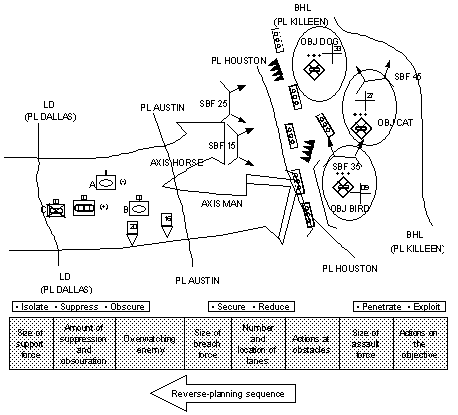
1-48. The commander begins developing COAs as discussed in FM 101-5 . He determines relative combat-power ratios, generates options, and arrays forces to accomplish the mission. He then develops the scheme of maneuver, including actions on the objective. In Figure 1-3 , a three-company-team TF is conducting a deliberate attack to destroy a motorized infantry company (MIC) in the defense. The commander believes seizing OBJ Cat to be decisive. This is the point from which reverse planning of actions on the objective begins. The commander uses Team C to seize the initial foothold (OBJ Bird) (point of penetration) into the enemy's defense. The focus of breach planning is to get Team C to its objective. The number and location of lanes are driven by Team C's maneuver on OBJ Bird as the assault force. The commander now plans how the breach force must maneuver to reduce the obstacle. Supporting fires from Company A and Team B in SBFs 15 and 25 are planned to support the reduction of the obstacle and the assault on the objective. Reverse planning continues to drive the maneuver formation to ensure that forces are in the correct relative positions to accomplish their missions.
|
Clear Subunit Instructions
1-49. Subordinate units must clearly understand their missions, how their missions relate to the phases of the operation, and what role adjacent units play in the overall plan. The commander may use an execution matrix to synchronize his forces. An execution matrix is a superb synchronization tool, and it lists subunit instructions sequentially in relation to key events or the sequence of the attack. It also provides subordinate commanders with an understanding of how their missions and those of adjacent units fit into the overall plan. More importantly, it allows subordinates to better track the battle and coordinate their own maneuver with that of adjacent units. This is critical to achieving unity of effort between support, breach, and assault forces. Figure 1-4 shows a sample execution matrix for the scheme of maneuver in Figure 1-3.
|
|
|||||
|
|
|||||
|
|
|||||
Effective C 2
1-50. Effective C 2 is paramount to mission success. C 2 is integrated into the plan through the use of maneuver and fire control measures and the positioning of key leaders to see the battle space. Maneuver control measures enable the commander to graphically convey his intent, scheme of maneuver, and subunit instructions. Relating subunit actions to the terrain is critical to successful execution.
1-51. In Figure 1-3, the commander uses PLs to initiate the breaching operation and to control actions on the objective. At PL Austin, the support force maneuvers to occupy SBFs 15 and 25. The assault force occupies checkpoint (CP) 16 to prevent premature advancement to the obstacle, reduction-site congestion, and the engagement of forces before lanes are created and marked. The commander uses target reference points (TRPs) on obvious terrain features to orient, focus, and shift suppressive direct and indirect fires.
1-52. Key leaders must be able to see the battle space to make informed decisions. Nowhere is this more true than during the breaching operation. The commander must position himself where he can best control the battle. Since effective suppression is the most critical event during breaching operations, the commander may position himself with the support force. This enables him to personally influence fire control and facilitate the necessary cross talk between breach and assault forces. The S3 may initially move with the breach force to track the progress of obstacle reduction and anticipate the commitment of the assault force. A commander who feels that his personal influence is required with the breach or assault force must make a conscious effort to track the entire battle and must not focus completely on the reduction of the obstacle or the assault itself.
Well-Rehearsed Forces
1-53. The most effective synchronization tool available to the commander is the rehearsal. The inherent complexity of the breaching operation makes rehearsals at every level essential to success. The commander must give his subordinates time to plan how they will execute their assigned missions and time to rehearse the plan with their unit. The TF facilitates rehearsals by preparing rehearsal sites and managing their use. The TF commander must be sensitive to the impact TF-level rehearsals have on subordinate planning and preparation, and he must carefully choose the time and place of the rehearsal. Company teams rehearse their support, breach, and assault roles. TF rehearsals focus on synchronizing the maneuver of support, breach, and assault forces to achieve the breaching fundamentals. Rehearsals also highlight key events that must be coordinated during breach execution.
Typical Breaching Operations
1-54. Table 1-3 shows the types of breaching operations versus the sizes of the enemy forces overwatching the obstacle.
|
NOTES: |
|||
Breaching Operations in Support of Deliberate and
Hasty Attacks
1-55. Attacks take place along a continuum based on the knowledge of the enemy's capabilities and disposition and the intentions and details of the friendly force's planning and preparation. The terms deliberate attack and hasty attack refer to the opposite ends of that continuum and describe characteristics of the attack:
- Deliberate attack . Friendly forces have more knowledge of the enemy situation and have more time to plan and prepare for the enemy. With this knowledge, friendly forces conducting the deliberate attack can develop detailed plans, task-organize to accomplish the mission, and execute rehearsals down to the lowest levels.
- Hasty attack . The enemy situation is vague, or it changes rapidly. Friendly forces have little or no time to plan or prepare for this type of operation. Because the primary purpose of the hasty attack is to maintain momentum or take advantage of the enemy situation, it is normally conducted only with the resources that are immediately available.
1-56. Breaching operations may be required to support an attack anywhere along the continuum. During a deliberate attack, friendly forces, such as engineers and smoke platoons, are task-organized before the attack to best support the concept of the operation. In a hasty attack, there may be insufficient time to task-organize assets, such as engineers and reduction assets, in the best manner. Additionally, the unit may not have time to plan the breaching operation in detail but may have to rely on the unit's SOP for execution. Regardless of where the attack falls along the continuum, the breaching tenets apply when conducting the breaching operation in support of the attack.
Planning Sequence
1-57. The scheme of maneuver, engineer operations, fires, air defense, and actions at obstacles are all based on the same SITEMP. Planners develop the breaching plan using the following sequence:
- Reverse planning begins with actions on the objective.
- Actions on the objective drive the size and composition of the assault force.
- The size of the assault force determines the number and location of lanes to be created.
- Lane requirements and the type of obstacle drive the amount and type of mobility assets task-organized to the breach force.
- The ability of the enemy to interfere with the reduction of the obstacle determines the size and composition of the security element in the breach force.
- The ability of the enemy to mass fires on the point of breach determines the amount of suppression required and the size and composition of the support force.